FILE PREPARATION
For best results, please follow the guidelines below.
We accept the following application formats: Adobe Photoshop, Adobe Illustrator, Adobe InDesign, Microsoft Publisher, Microsoft PowerPoint and Microsoft Word.
We accept TIFF, JPEG, PSD, PS, AI, EPS and PDF file types as well as native documents from the accepted applications list.
Stripes Recommends PDF
We recommend you deliver a high-resolution PDF as the final file format to submit for printing. As there are numerous software packages and file formats that may be used to create artwork, it is almost impossible for a printer to reproduce the same output that the customer sees on their own computer. For this reason, the printing industry has standardized on the PDF file as the best format for printing. A PDF file is a "self contained" document and usually has everything necessary to print the file, including necessary fonts.
One-Up: Please set up your art as "one-up" — single pages or "reader's spreads." Please do not supply two or more "up" printer's spreads. We will impose for the press here in the shop.
Bleed: If you have a color background, image, or design to the edge of the product, please set a bleed on your file. (See next page for definition.)
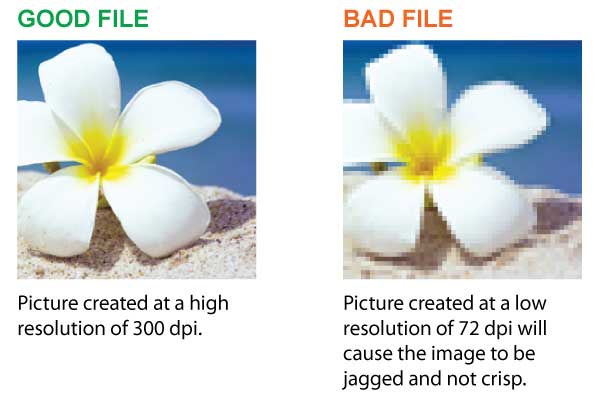
300 DPI for printing: Resolution, also known as DPI (dots per inch) or PPI (pixels per inch), can be described as the number of dots that fit horizontally and vertically into a one-inch space. Generally, the more dots per inch, the more detail captured and the sharper the resulting image. For an image to print properly, the image resolution must be at least 300 dots per inch (DPI) at the final output size.
CMYK: All color artwork and/or images must be provided in CMYK (Cyan, Magenta, Yellow, Black) color mode, not RGB mode.
Grayscale: All black and white artwork and/or images must be provided in grayscale color mode.
Rich Black: When you want an area of solid black (e.g., boxes, big bold lettering, etc.) within a document, 100% black (K) will not result in a solid, saturated black. If you have a patterned background underneath the solid black area that is not set at rich black, then the pattern will show up through the solid black area. In order to avoid this, you should use rich black, which is made by mixing other colors of ink with black ink to produce a much darker, deeper black on the press than can be achieved by using black ink alone. Since heavy ink might cause smearing, we recommend adding 20% Cyan (C) to 100% Black (K) to create a rich black (please leave Magenta and Yellow at 0%).
Black Text: On the other hand, black text must be provided in solid black, not a mixture of CMYK. Regular black text is not thick enough for the patterns underneath to show through.
We will reproduce color from submitted print-ready files as closely as possible, but even under the best circumstances an exact color match is not possible. This is an inherent limitation in the printing process. The term "color match" refers to the color rendering intent specified in the submitted artwork.
Hard Proof: Since every computer screen (and design software) renders color differently, artwork will always appear slightly different from what was displayed on your screen originally. For these reasons, we cannot be responsible for color variations between submitted files and the final printed piece. If exact color is critical, you should request a hard proof to review, as it will very closely represent the final expected print output.
We may ask you to send us the native design file in case we need to make adjustments for printing. If so, all images must be provided or embedded. (For example, Adobe InDesign has a feature called "Package" that automatically captures all fonts and images used in a file.)
Fonts must be outlined or converted to paths or curves in EPS files. Please note that some fonts have copyright restrictions and will not embed in PDF Files.
Do not use "fill" to draw lines. When drawing lines, please make sure the line is drawn with a "stroke" at the minimum of 0.3 points, and do not use "fill." If the "fill" is used or the line is less than 0.3 points, the line may appear on a computer screen but it will not print clearly.
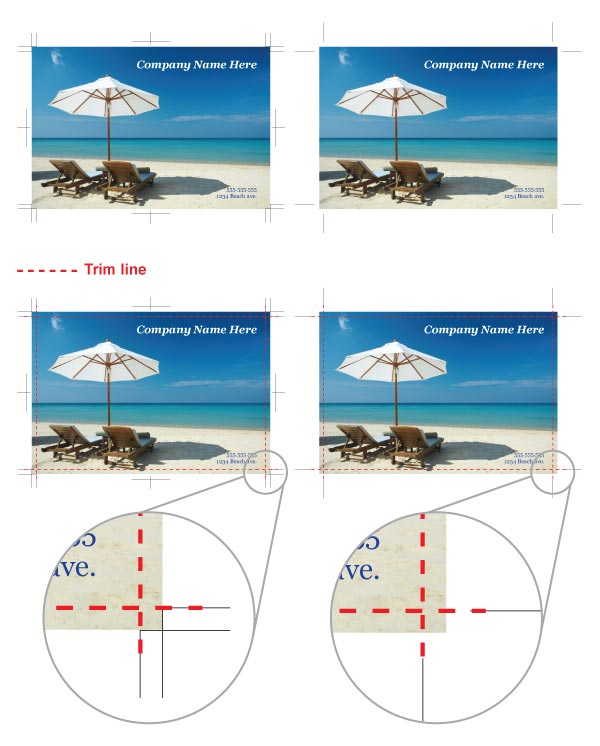
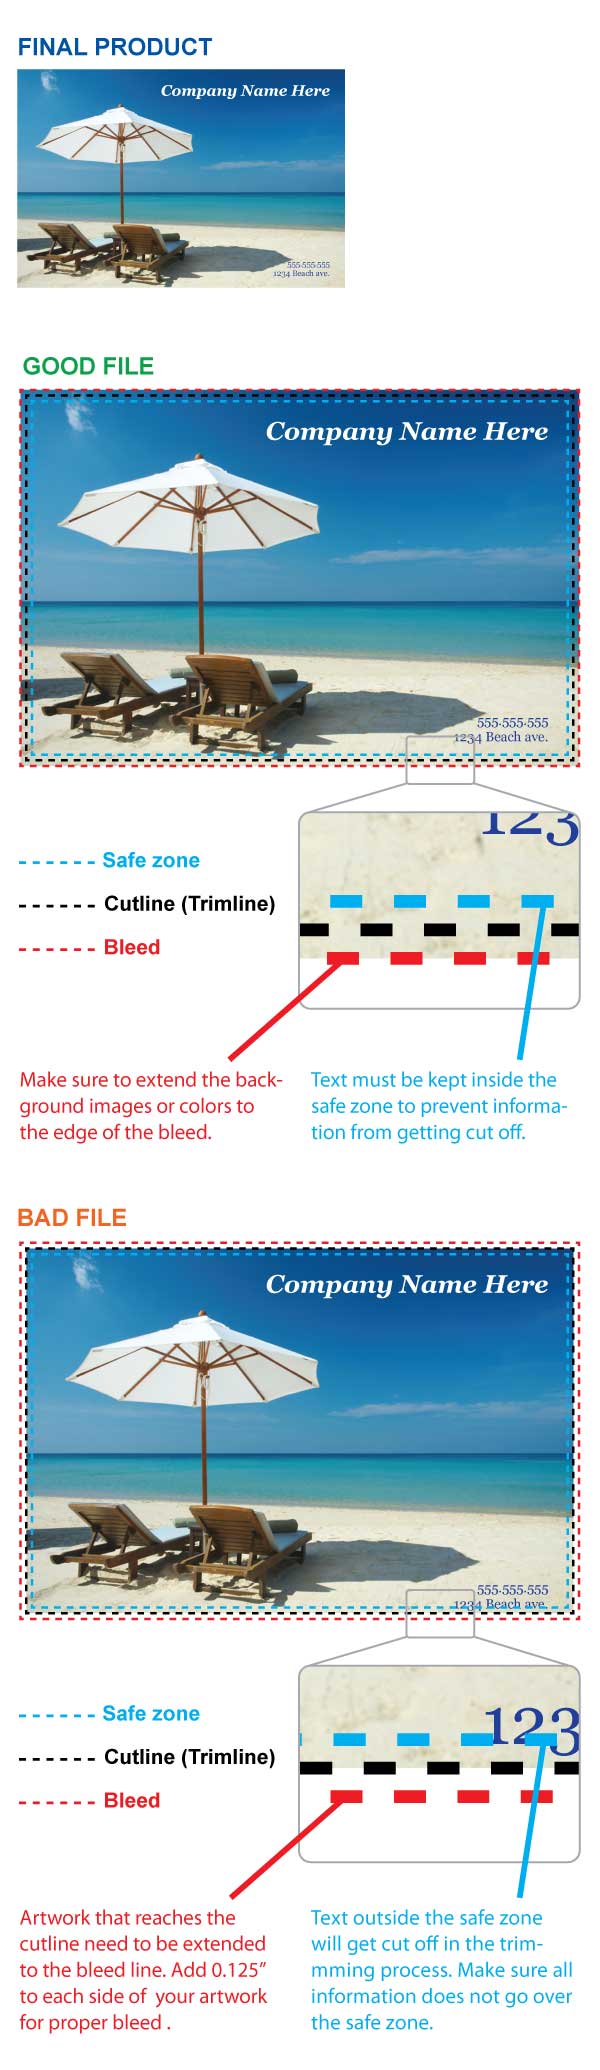
Bleed is the portion of the product that will be trimmed off when it is cut to final size.
Please build your print-ready digital files by adding the appropriate bleed to your file. If your image has a white border on all four sides, bleeds are not required. Prepare your files at the exact dimensions of the desired output.
The purpose of a bleed is to continue a color, image, or design to the edge of the product. Due to the possibility of shifting in the trimming process, a bleed is required to ensure that a white line does not show on the edges of your product. We automatically trim the bleed off of each side, which will result in the desired trim size.
If your print job has a bleed, please make sure your artwork overlaps the edge of the page by 1/8 inch (0.125") to 1/4 inch (0.25"). 1/8 inch is sufficient for smaller jobs, such as business cards, post cards, flyers and the like. 1/4 inch is preferable for large format jobs such as posters, signs, banners, canvas prints, or trade show graphics.
Microsoft Word does not give you the option for bleeds when creating a document. Therefore, it is important when using Microsoft Word to make sure to incorporate the bleed measurement into the actual document size.
When using other applications, please don't forget to include the bleed measurement in the PDF settings when creating a PDF file. You may have the bleed settings on an InDesign document but they will not be reflected on the PDF file if the bleed setting is not marked when converting to PDF.
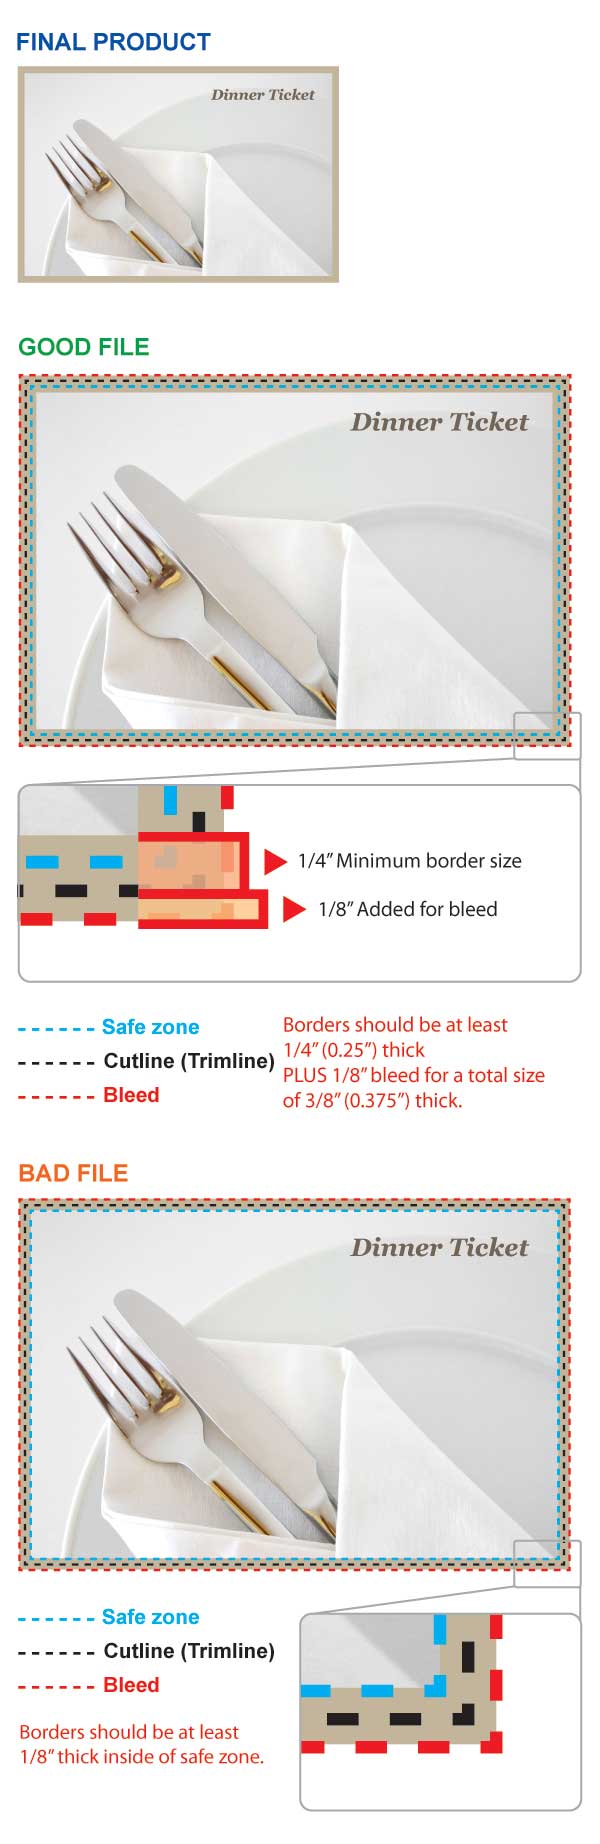
Edge Safe Zone: All critical elements (text, images, logos, etc.) must be kept at least 0.125" inside the edge. Anything left close to edge may be cut off during trimming.
If your artwork contains borders, you must make sure all borders are 1/4 (0.25) of an inch wide on each side of your artwork. In addition, you need to add a 1/8 (0.125) of an inch bleed on each side of your artwork. This approach will ensure proper cutting and help the finished product maintain a symmetrical appearance. If your border is not at least 1/4 (0.25) of an inch wide on each side, you risk creating a border that looks uneven.
We do not recommend crossover images and/or copy, as these elements may be lost in the gutter and may not line up after binding. Please keep all critical images and/or copy within the Safe Zone to ensure these elements are clearly visible and there are no line-up registration issues when the product is bound.
Please build your press-ready digital files by adding crop marks. Lines indicating where the paper should be cut to produce the correct size.